Delay~
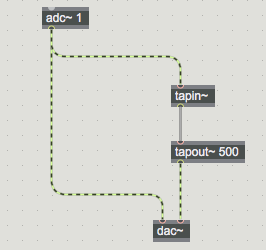
Tapin~ tapout~
Feedback system
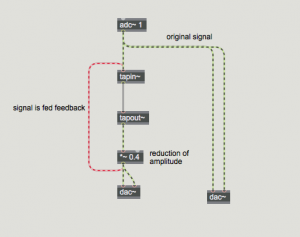
When a sound signal is delayed simply is played back by loudspeakers after the original signal, at a specified time. The delayed signal can be fed back into the delay system again and continuously in a loop, and this loop generates a series of delays at the same specified time that can keep sounding until fading out.
This is called the feedback effect.
The fading of the sound is due to applying a subtle diminution of amplitude each time the signal pass into the system. An addition of amplitude instead would create distortions and crash Max audio if reaching too high amplitude levels.
The feedback system allows for different and interesting sonic effect. You can transform the timbre and create powerful dynamically changing delay tails to each sound just by playing with the delay time and the feedback amplitude reduction.
In this video:
Jimi Hendrix taps the back of the guitar with the purpose of increasing the amplitude of the vibrating string, to produce resonance effects, powered also by the loud volumes of the amplifier feeding back into the guitar pickups. In acoustics, resonance is a specific effect caused by a driving force applied to a vibrating object: the tapping on the fingerboard and the volume of the amplifier are two of these forces that Jimi is using to produce his sounds.
Ramping the delay time changes for avoiding clicks
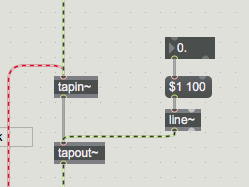
Tapout~ could be instructed to playback the delayed signal at specific times in different ways: by typing into the object’s body as an argument or by sending it a value with a number box in its inlet. Another method and the one that can be used in real time without fear of generating clips in the audio is to use a line~ object ramp to provide delay time values to tapout~.
The picture shows tapout~ receiving a line~ ramp to go to a certain time value in 100 ms.
Flanger and chorus effects
The possibility to dynamically change the delay time instruction to tapout~ can lead to the production of other audio effects. These are the well-known flanger and chorus effect.
Flanger
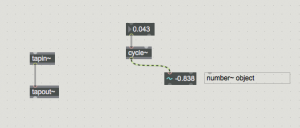
The flanger effect is an effect generated by a delay window that changes cyclically and continuously over time. It is possible to build that starting from the cyclical motion of a cycle~ oscillator.
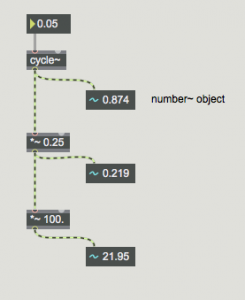
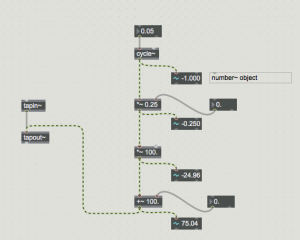
For clarity of demonstration, I have added in the patcher a number~ object which helps me to illustrate what happens in Max at signal level.
The cycle~ oscillation between -1 and 1 values can produce the cyclical variation of the delay time that we are seeking out. A variation between -1 and 1 is not enough, though, so we need to make it bigger.
For example, a good starting oscillation could be 25 ms over a delay window of 100 ms (oscillating between 75ms and 125ms). I would need to transform the cycle~ object’s oscillation between -1 and 1 into an oscillation between -25 to 25.
To do so I simply scaled the values multiplying it by 0.25 and then again multiplying by 100 to get rid of the comma.
Now I have a good oscillating number between -25 and 25 that I can add to my delay window, which I decided to be of 100 ms size.
At this stage the cycle~ and its chain of signal operations can be connected to tapout~, producing a flanger effect on the incoming signal. The window values and the oscillation range can be changed, producing very interesting variations. The speed of the oscillation (the cycle~ object frequency) is also extremely important in adjusting the effect.
important
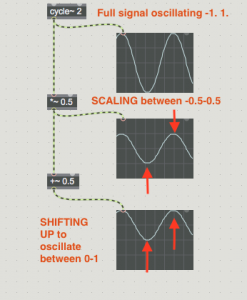
In class, we have seen another method for building the precise signal to create a flanger effect. The current method scales the signal first to generate the right size oscillation but keeps its oscillation as bipolar until the end.
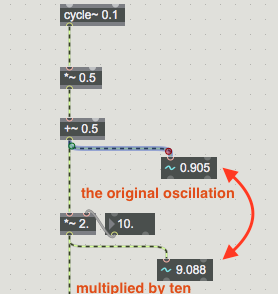
Instead in class, we approached a simpler method, which connects well with what you have already learned in this lesson when working with synthesis. We take a cycle~ oscillator and immediately transform its bipolar oscillation into unipolar:
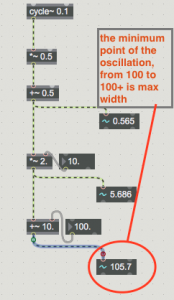
This signal is perfect for creating a delay window oscillating in size, between 0 and 1. Now simply it needs some width, and we can create so by multiplying that oscillation by a number
from a point in time, which is the initial minimum delay window, that will increase accordingly to the width specified as before.
Chorus
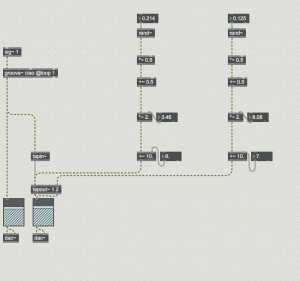
The chorus effect, which recalls the richness of the sound of a string section as opposed to the one of a violin solo, is obtained through the same process. The only difference is that the oscillation is unpredictable, and therefore a cycle~ oscillator is not anymore suitable. More effective is the object rand~, which creates random signal values similar to noise, but at an adjustable frequency.
You can either build it that way or use the method seen in class for flanger, that is converting first into unipolar signal. What makes a difference is to have a different type of oscillation, not cyclical, but unpredictable, and with very minimal variations. Here is how it looks a two voices chorus effect. You can add as many as you want, for as many as tapout~ inlets-outlets:
